Ahh the soufflé – it has all the stability of a hormonal teenage girl in love. The potential for highs as high as the farthest reaches of the galaxy and lows so low I shudder to contemplate the depths. Perfection and bliss can plummet into heartbreak and disaster in the blink of an eye (or the slam of a door).
This is why I decided to see if I could come up with a gluten free recipe for soufflé that was a lot more stable, less fraught with potential disaster, much more “user friendly”.
Typically a soufflé is made by combining a sauce that starts with a mixture of flour and butter, enriched with cream or milk and egg yolks then folding this into stiffly beaten egg whites. It is time consuming and the results are fragile. So many things can cause the soufflé not to rise and then even if does rise, a loud noise, a gush of air or even your breathe can cause it to fall. And of course getting something to the table this fragile is just plain stressful.
I recall reading a long time ago about a soufflé that was made in the blender and was stabilized with cream cheese instead of flour. Of course I don’t remember where I read that or how the whole process was supposed to work but never-the-less, I decided to do what I do best, get in the kitchen and play around.
I tried just blending the whole eggs in the blender first, not separating the whites from the yolks and I have to say this resulted in a very decent soufflé-like product. It was stable, kept well and could be prepared ahead of time. My only problem with it was it didn’t get as puffy as I would have liked; they rose but the tops were flat like a table top, not puffed. So I them decided to separate the egg whites from the yolks, do the blender thing with the yolks and whip the whites separately – much better! Light, airy soufflés that rose beautifully did not collapse and most importantly, stable!
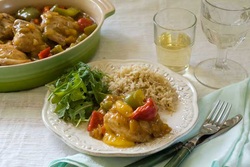
If you have wanted to entertain with soufflés but were afraid of the hormonal, emotional roller coaster – this is the recipe for you. The egg yolks base can be prepared up to a couple hours ahead. While it is probably best to whip the egg whites and combine them with the yolk mixture just before putting the soufflés into the oven, I let mine sit for about 10 minutes first, just to see what would happen and they were perfectly great! And I didn’t have to rush these to the table. I know how to photograph items that are fragile; I have learned a few tricks along the way. But I wanted you to see what these soufflés looked like after sitting around for 10 minutes or so and as you can see in the photos, these guys held up quite well indeed.
And speaking of hormones and the crazy things they can do to not only teenage girls (and boys!) but all of us, do you really want to eat eggs that come from chickens that are injected full of hormones? I think not! Look for organic, cage free eggs that are free of hormones and antibiotics. I use Nature’s Yolk eggs, after all the egg is really the star of this show and who wants a hormonal diva as the star?
If the method of adding the whipped egg whites to the yolk mixture seems backwards to you, it is. I didn’t want to pour my egg yolk mixture into another bowl and have another thing to wash up; I am assuming you will appreciate this concept as much as I do.
I made these in individual 1 cup ramekins but you can also bake this in a large 8 cup soufflé dish – increase cooking time to 40 – 45 minutes. Also I used a combination of garlic and herb soft cheese, goat cheese and cream cheese because it just seemed like a great springtime combo to me but I think the possibilities are endless!
So here you go – a gluten free recipe for a stress-free “miracle” soufflé that won’t send you on an emotional roller coaster and is also great for a people on a low carb diet as well as a gluten free diet.
Gluten Free “Miracle” Cheese and Herb SoufflésIngredients1 tablespoon softened butter or gluten-free non-stick cooking spray
6 large organic cage free eggs (Nature’s Yolk)
½ cup heavy cream
½ teaspoon kosher or fine sea salt
½ teaspoon freshly ground black pepper
8 ounces goat cheese, crumbled
6.5 ounces garlic and herb soft cheese (such as Boursin or Alouette)
4 ounces cream cheese, cut into 1 inch pieces
¾ teaspoon cream of tartar
DirectionsPreheat oven to 375 degrees. Generously grease 8 – 1 cup oven safe ramekins or 1 – 8 cup soufflé dish with either butter or non-stick cooking spray.
Separate the egg whites from the yolks placing the whites in a mixing bowl and the yolks in a blender.
To the egg yolks add the cream, salt and pepper. Turn the blender on high and mix until combined. With the blender running, add in the crumbled goat cheese, a little at a time. Then spoon in the garlic and herb cheese and finally add in the pieces of cream cheese, letting the mixture blend for a second between each addition. Once all the cheeses have been added and the ingredients are fully incorporated, blend for 5 more seconds.
Add the cream of tartar to the egg whites and mix in a stand mixer or with a hand held mixer on low until the cream of tartar is fully incorporated into the whites. Gradually increase the speed of the mixer to high and mix until stiff peaks form. Pour about ¼ of the egg yolk mixture into the egg whites and fold in until fully mixed. Add the remaining egg whites and fold in, it is fine if there are a few larger pieces of egg whites in the mixture. Spoon the mixture into the prepared dish(es) and bake for 15 – 20 minutes for individual soufflés, 40 – 45 minutes for a large soufflé. The soufflés should be risen and golden brown.
A gluten free recipe that serves 8.
Ready for more dessert?
Simply…Gluten-Free Desserts is now available, with over 135 recipes not featured in my blog.
Available at bookstores including Barnes & Noble, Borders, Powells, Books-a-Million and Amazon. You can get it also HERE.
http://simplygluten-free.com/blog/2012/03/gluten-free-miracle-souffles-recipe.html#comment-229695
Leaving cookies and milk for Santa is something we always do in this house. Call it appreciation for the gifts he will bestow, offering some Gluten Free sustenance for a long night or maybe even just a little extra assurance that Santa will know we have been nice this year, not naughty. Every year it is something different. This year we are leaving Gluten Free Santa’s Thumbprint Cookies. We thought maybe he would feel a twinge of recognition and know how grateful we are. For maraschino cherries without red dye or corn syrup, try these. If you put out cookies for Santa, what kind do you leave? Gluten Free Santa’s Thumbprint Cookies Ingredients 4 cups pastry quality gluten-free flour 1 tablespoon baking powder ¾ teaspoon salt 1 cup unsalted butter, at room temperature ¾ cup granulated sugar ¾ cup corn syrup or light agave nectar 1 large egg 2 teaspoons pure vanilla extract ½ cup sanding sugar (or just more granulated sugar) One 11 ounce bag semisweet chocolate chips 24 maraschino cherries, cut in half and dried well Directions Whisk together the flour, baking powder and salt and set aside. Cream together the butter and ¾ cup sugar with an electric mixer. Add the corn syrup, egg and vanilla and mix well. Gradually add the flour mixture, with the mixer on low, and beat until combined. With a spatula, scrap the sides and bottom of the bowl to make sure everything is mixed well. Roll the dough into 1 inch balls then roll in the sanding sugar and place on a plate or baking sheet – you can put them on top of each other – and refrigerate for 30 minutes. You can make ahead of time but if they are refrigerated for more than 30 minutes you will have to let them sit out for a few minutes before proceeding. Preheat oven to 350 degrees. Line 2 cookie sheets with parchment paper or silicon baking mats. Place the balls on the prepared cookie sheets about an inch apart. Flatten with your thumb, making an indentation in each ball. Bake for 10 – 12 minutes or until firm but not beginning to brown. Leave oven on. If the indentations have risen, use the end of a wooden spoon to depress again. Fill each indentation with a teaspoon of chocolate chips. Return to oven for 2 minutes. Using a small offset spatula or spoon, swirl the chocolate chips to melt. Top each cookie with a maraschino cherry half. Want to know more about your favorite Gluten Free Recipe or how to avoid being bothered by Celiac with our range of Gluten Free Recipes which are made from Gluten Free raw material feel free to visit us at: http://www.simplygluten-free.com Article Source: http://simplygluten-free.com/blog/2011/12/gluten-free-santas-thumbprint-cookies-recipe.html
Once upon a time a caprese salad, bursting with fresh tomatoes, basil and mozzarella met up with a gluten free pasta salad. They fell instantly in love. The resulting love child of this auspicious union was the gluten free caprese pasta salad. A love story if ever I heard one. Gluten Free Caprese Salad Ingredients 1 – 16 ounce package gluten free rice pasta (shells, elbows or spirals) 1 ½ cup loosely packed fresh bail leaves, use divided 1 clove garlic, minced Zest and juice of 1 lemon ½ teaspoon kosher or fine sea salt ½ teaspoon freshly ground black pepper 1/3 cup olive oil (maybe a tad more) 1 pint cherry or grape tomatoes, halved 6 ounces bocconcini (small mozzarella balls), quartered Directions Cook the pasta in heavily salted water 1 or 2 minutes less than the package instructions until just al dente. Drain well and put the pasta into a large serving bowl. While the pasta is cooking combine 1 cup of the basil with the garlic, finely grated lemon zest, lemon juice, salt and pepper in a blender and blend until the basil is finely minced and the mixture is combined. Take the plastic top insert from the top of the blender out and slowly stream in the olive oil with the machine running. You want a thick dressing but not as thick as mayonnaise. If the mixture is too thick, add more olive oil. Once the pasta is cooked and drained pour the dressing over the warm pasta. Toss well and let cool. Roll the remaining basil leaves up like a cigar and cut into thin slices with a sharp knife. When the pasta has cooled, add the basil, tomatoes and bocconcini. Cover and refrigerate for at least half an hour or up to two days. Taste and adjust seasoning with more salt and pepper if needed. This gluten free recipe serves 6 – 8 people. Article Source: http://simplygluten-free.com/blog/2011/09/gluten-free-caprese-salad-recipe.html
As we come to the end of summer we also come to the end of the sweet cherry season. Just when I was starting to take for granted lush, ripe, juicy cherries I realized it was time to start REALLY appreciating them and using them in as many gluten free recipes as I can before they were gone for this year. So along with blending some into smoothies and baking them into muffins and pies I decided to venture out into other parts of the menu – the appetizer for example. What’s that you say? Cherry appetizers? Seriously? Yep, seriously! Baked with creamy brie and another summer favorite, basil, cherries make for a sophisticated yet seriously simple starter. But don’t take my word for it, throw together this recipe and see for yourself. But hurry! Cherry season is almost over. Oh and if you don’t already have one, this would be a good time to invest 5 or 10 dollars in a cherry pitter. This one, you can take my word for – they work great! Baked Cherry and Brie Appetizer
Ingredients2 pounds sweet cherries, pitted ½ teaspoon kosher or sea salt Large pinch black pepper ¼ cup loosely packed fresh basil leaves, chopped 1 – 7 ounce round of brie 8 slices gluten-free bread 4 sprigs of fresh basil for garnish DirectionsCombine the cherries, salt, pepper and chopped basil in a mixing bowl. Cover and refrigerate for at least 2 hours and up to a day ahead. Preheat oven to 350 degrees. Place on rack in the top third of the oven and the other rack in the bottom third. Slice the crusts off the gluten free bread and cut each slice in half diagonally to make triangles. Lay on a baking sheet. Divide the cherries along with any accumulated juices into 4 ramekins. Cut the rind off the round of brie and cut into quarters. Place the brie quarter on top of the cherries. Place the ramekins on a baking sheet. Put the bread on the top shelf of the oven and the cherries on the bottom. Bake for 10 – 12 minutes or until the bread is toasted and the cheese is melted. Garnish each ramekin with a sprig of fresh basil and 4 toast triangles and serve immediately. A gluten free recipe that serves 4 people (or 1 really greedy cherry lover like me!). Want to know more about your favorite Gluten Free Recipe or how to avoid being bothered by Celiac with our range of Gluten Free Recipes which are made from Gluten Free raw material feel free to visit us at: http://www.simplygluten-free.com Article Source: http://simplygluten-free.com/blog/2011/08/gluten-free-baked-cherry-and-brie-appetizer-recipe.html
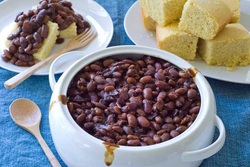 There are certain things that make me crazy, like when gluten is added to foods that are naturally glutenfree! Like canned baked beans! For crying out loud, why ADD gluten to beans? So I decided to make my own baked beans gluten-free recipe for a barbeque but I didn’t want to actually BAKE them because it is almost 100 degrees outside with like 99 percent humidity – ahhh… the joys of Florida in the summer! So with a little help of my slow cooker and a bag of Hurst Family Harvest Tri-Bean Soup mix, I made the most wonderful tasting gluten-free baked beans and kept my cool. They even had this fabulous smoky flavor without an ounce of bacon, thanks to the flavor packet in the bean mix. I really wanted to keep the recipe vegan for my sister but also please my g-kid Julian whose favorite food in the world is baked pork and beans. For a nice vegetarian or vegan meal, serve the beans over some gluten-free cornbread like we did – yummers! You need to plan ahead to make this recipe since the beans need to pre-cook and soak overnight but it takes very little work and I did the pre-cooking while I already had the kitchen heated up making dinner. Love this – do all the cooking at one time! Ingredients 1 packet Hurst Family Harvest Tri-Bean Soup Mix 8 cups water 1 cup chopped onion (about ½ medium onion) ¼ cup ketchup 1 tablespoon apple cider vinegar ½ cup molasses ¼ cup light brown sugar 1 teaspoon dry mustard ¼ teaspoon black pepper Directions The night before, combine the bean from the bean mix (reserve the flavor packet for later) and water in a large saucepan, bring to a boil, reduce heat to simmer and cook for 1 ½ hours. Pour the beans and the cooking liquid into a bowl, let cool and refrigerate overnight (8 -12 hours). In the morning, drain off all but 1 cup of the liquid and put the beans into a slow cooker with the reserved flavor packet and the remaining ingredients. Cook on low for 10 – 12 hours (you can cook longer if you like your beans softer). To concentrate the liquid more, turn the slow cooker to high for the last hour of cooking. Can be made several days ahead, it gets better and better with time. Store covered in the refrigerator. This gluten free recipe makes 10 servings. Want to know more about your favorite Gluten Free Recipe or how to avoid being bothered by Celiac with our range of Gluten Free Recipes which are made from Gluten Free raw material feel free to visit us at: http://www.simplygluten-free.com Article Source : http://simplygluten-free.com/blog/2011/07/gluten-free-slow-cooker-baked-beans.html
This is your new blog post. Click here and start typing, or drag in elements from the top bar.
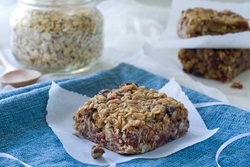 A glutenfree girl, a lactose intolerant boy and a tyke with a nasty peanut allergy get into a car… No, this is not the beginning of a joke, it was the beginning of a family day of adventure, off to trek through the Florida swamps, wrangle alligators, and to top it all off with a refreshing dip in the Gulf of Mexico. A long day and if it was going to be a fun day, allergy friendly snacks were required. Nothing can ruin a fun day like a carload of hungry, cranky kids! So along with fresh fruit, hummus and veggies, and an assortment of salty, gluten-free crackers and snacks, I made some allergy friendly granola bars. The base of these super allergy friendly granola bars is gluten-free rolled oats, Sunbutter (a nut-free peanut butter substitute), a mashedbanana, some melted Earth Balance dairy free butter substitute and coconut sugar. The recipe is almost more like a suggestion because you can elaborate any way you like. I filled mine with pumpkin seeds, dried fruit (a combination of cranberries, blueberries and cherries) and a handful of dairy-free chocolate chunks – healthy with just a touch of naughty, but you can make yours as naughty or nice as you like. Since I was feeding younger kids I used semi-sweet chocolate chucks but rich, dark chocolate would be fabulous. If you like coconut, throw it in! Tree nuts not a problem? Add some slivered almonds. Peanuts ok? Just use peanut butter. You get the idea. You can add up to a cup of additional items with no problem and substitute whatever type of seeds you like, a combination is fine too. Mine were fairly simple (due to a four year old palate) and thus were really moist and chewy, if you add in more stuff such as coconut or nuts, it may be a bit drier. I personally like salt mixed with my sweet so I sprinkled on a little more coarse salt before popping in the oven. I made these for the kids to keep them happy and well fed but to be perfectly honest, they were so delicious my sister and I almost hid them and kept them all for ourselves. (OK, I confess, we did hide a couple and had them for breakfast the next day. I know we are bad grown ups…) Oh, and in case you hadn’t noticed, these granola bars are not only gluten, dairy and nut free, they are also egg free, vegan and if you use coconut sugar and the Organic Sunbutter, they are also refined-sugar free! Seems the only thing there are not free of is amazing flavor! Granola Bars Ingredients ¾ cup Sunbutter (I like Natural Crunch but Creamy is good too) ½ cup coconut sugar, Sucanat or brown sugar 1 medium banana, peeled and mashed ½ cup butter or dairy free butter substitute, melted 1 tablespoon pure vanilla extract ½ – 1 teaspoon kosher or fine sea salt 2 ½ cups certified gluten-free rolled oats ½ cup roasted and salted pumpkin seeds 1 cup dried fruit, raisins or a combination – if using larger pieces of dried fruit, chop roughly ½ cup chocolate chunks or chips (optional – you can add up to a cup of additional ingredients such as coconut flakes, slivered or chopped nuts, flax, chia, sunflower or sesame seeds) Directions Preheat oven to 350 degrees. Spray an 8 inch by 8 inch baking pan with gluten-free, non-stick cooking spray. In a large mixing bowl, stir together the Sunbutter, sugar, mashed banana, melted butter or butter substitute and vanilla until well combined. Stir in the remaining ingredients until they are evenly distributed. Press the mixture firmly and evenly into the prepared pan. Bake for 30 – 35 minutes or until golden brown. Let cool completely and then cut into squares. Will keep wrapped in plastic wrap at room temperature for several days or in the refrigerator for up to a week. This gluten-free recipe makes 8 servings approximately 2 ¾ inches square. Want to know more about your favorite Gluten Free Recipe or how to avoid being bothered by Celiac with our range of Gluten Free Recipes which are made from Gluten Free raw material feel free to visit us at: http://www.simplygluten-free.com Article Source : http://simplygluten-free.com/blog/2011/07/granola-bars-gluten-free-dairy-free-nut-free.html
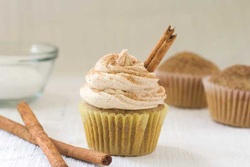 I was having a conversation with my g-kid Julian about his following a glutenfree, dairy-free diet and he said to me “I just don’t want to have to worry about what I eat!” Of course he doesn’t, he’s 10! I know lots of grown ups who don’t want to worry about what they eat either. I believe the best way to get kids to embrace their diet, regardless of the intolerance, is to make them a part of the process of creating their food; everything from thinking up menus to shopping to cooking. The best part is enjoying the fruits of their labor. The other day the g-kids and I planned a whole menu for my son’s birthday, everything was gluten and dairy free and it was abundant; we had London Broil, grilled tilapia, dairy-free mashed potatoes, gluten-free pasta salad, a mixed salad filled with all sorts of fresh veggies and of course a gluten-free birthday cake. The kids came up with the menu, prepared the marinade for the beef, peeled the potatoes, picked basil from the garden and tasted, laughed and enjoyed themselves. They even set and decorated the table. It was a great day and an even better dinner. A couple days later we actually worked on developing our own recipe together. We decided to make cupcakes and Miss Milla wanted to make a cupcake that tasted like ONE of her favorite cookies (emphasis on ONE because, as per her, it is simply not fair to the other cookies to pick just one favorite) the Snickerdoodle. What a joy to bring the kids into the whole creative process of developing a recipe, they gave their opinions, stirred and wrote down notes and we had a marvelous time, especially when it came to taste-testing. We kept it easy and started with a packet of Kinnikinnick White Cake Mix which is not just gluten-free but dairy free also. We added cinnamon and vanilla and then topped the cupcakes with cinnamon sugar to replicate the coating from the original inspiration – the Snickerdoodle Cookie. Then we came up with a dairy free “butter” cream frosting and topped it all off with just a tad more cinnamon sugar. The verdict? See for yourself. Gluten Free Dairy Free Snickerdoodle Cupcakes Ingredients Topping: 6 teaspoons sugar 1 teaspoon cinnamon Cupcakes: 4 large eggs ¾ cup grapeseed (or other neutral tasting) oil ¾ cup cold water 1 teaspoon pure vanilla extract 1 Kinnikinnick White Cake Mix 1 teaspoon ground cinnamon Frosting: ½ cup Earth Balance (or other dairy free butter substitute) 4 cups powdered sugar 1 teaspoon ground cinnamon 1 pinch kosher or fine sea salt 2 teaspoon pure vanilla extract 2 – 6 tablespoons rice milk (or other dairy free milk) Garnish – Optional 6 cinnamon sticks, each one broken into thirds. Directions Preheat oven to 350 degrees. Line 18 standard muffin tins with paper liners. Combine topping ingredients in a small bowl. Combine eggs, oil, water and vanilla in a mixing bowl and whisk (either by hand or with a handheld mixer) for 2 minutes. Gradually add the cake mix and cinnamon, whisk just until combined. Wisk just until combined, mixture will be a little lumpy. Divide batter among prepared muffin tins. Sprinkle about ¼ teaspoon of the topping on each cupcake. Bake for 20 minutes or until risen, lightly browned and a tooth pick inserted in the center comes out clean. Let cool. While cupcakes are cooling, make the frosting. In the bowl of an electric mixer, preferably fitted with a paddle attachment, beat the Earth Balance until smooth. Add the powdered sugar. Cinnamon, salt, vanilla and 2 tablespoons rice milk. Start with the mixer or low and combine. Gradually add more rice milk until the mixture becomes a spreadable consistency. Turn mixer up to medium-high and beat for 30 seconds or so until very creamy. Frost the cooled cupcakes. Sprinkle the frosting with the remaining topping. Insert a piece of cinnamon stick into each cupcake cake if desired. Cupcakes and frosting can be made several days ahead. For best results store cupcakes unfrosted in the fridge, covered with plastic wrap. Store frosting separately in a covered container in the fridge. Let frosting come to room temperature before frosting cupcakes. Frost the cupcakes no longer than a few hours before serving. Makes 18 gluten-free, dairy-free cupcakes Ready for dessert? Want to know more about your favorite Gluten Free Recipe or how to avoid being bothered by Celiac with our range of Gluten Free Recipes which are made from Gluten Free raw material feel free to visit us at: http://www.simplygluten-free.com Article Source : http://simplygluten-free.com/blog/2011/07/gluten-free-snickerdoodle-cupcakes-dairy-free.html
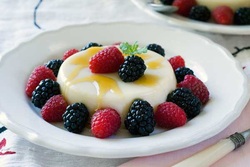 While my husband was outside making fire, fighting off mosquitoes the size of hummingbirds and being a he-man at the barbeque today, I was in the house doing “the woman’s work” of making side dishes and dessert for Memorial Day. I know I should be offended by this concept that my hubby is the only one in the family capable of manning the grill but let me tell you a secret, I would so rather stay inside, nice and cool, bug-free and look like I am working hard, taking lots of credit when in fact nothing could be further from the truth. I am all about simple with lots of “WOW” factor. Take this cool and refreshing dessert, just the thing after a heavy meal. It is a glutenfree, dairy-free, honey panna cotta. It seems fancy-schmancy, but in fact, it takes just a few minutes of active work and the rest of the time, the fridge does all the work for you! In this recipe the honey is not only the sweetener but the flavoring agent so it is important to use good honey – I used Fair Trade Organic Amber Honey from Wholesome Sweeteners. I also used almond milk but you can use any kind of milk you like. Topped with a handful of sweet/tart berries and another drizzle of honey, this dessert is a symphony of tastes and textures. OK, off to make myself look tired (I am going to have to work at it, I’ve been loafing all day!) and then to accept kudos for my lovely dessert. Can we keep just how easy it was to ourselves? Thanks! Honey Panna Cotta Recipe Ingredients 3 tablespoons water 1 packet (2.5 ounces) unflavored gelatin 2 cups almond milk 1/3 cup honey plus more for serving Pinch of kosher or fine sea salt 1 pint berries 6 mint springs for garnish, optional Directions In a small bowl, stir together the water and gelatin and let sit for 5 minutes. Meanwhile put the almond milk, honey and salt in a medium saucepan and bring just to a boil over medium-high heat. Microwave the gelatin for 10 second on high power and stir into the milk/honey mixture. Lightly oil six 4 ounce ramekins and then ladle the milk/honey mixture into them. Refrigerate until cold and firm, about 4 hours. To un-mold, run a sharp knife around the edge of each ramekin and place in a bowl of very warm water for 10 – 15 seconds. Place a plate on top of the ramekin and invert. Scatter some berries around the panna cotta and drizzle with some additional honey. Serves 6 glutenfree people. Want to know more about your favorite Gluten Free Recipe; with our range of Gluten Free Recipes which are made from Gluten Free raw material feel free to visit us at: http://www.simplygluten-free.com Article Source : http://simplygluten-free.com/blog/2011/05/gluten-free-honey-panna-cotta.html
 I have been accused of being a glutenfree food shopaholic. I won’t mention the person’s name but let me just say this – I am married to him. While I might agree that 25 cans of anchovy fillets in the pantry is a tad extreme, I do not agree that the 15 jars of piri-piri sauce I brought home from Africa was unnecessary, after all I don’t know when I will be returning to Africa. Now, maybe the hubby has a point that I should actually USE some of that piri-piri sauce and not just save it because I am worried I won’t be able to purchase more. Maybe. An architect friend of ours once did a little survey of my cupboards and such, in an attempt to help us find more storage space. He mentioned that I had enough food, cosmetics and shoes to survive a nuclear holocaust. I felt very proud! After all, if in deed we do suffer a nuclear holocaust who wants to go hungry, look haggard, or run around barefoot? Funny thing is he didn’t say it like it was “good” thing. So the other day when I was off to the grocery store again (the third time that day) my husband says to me “why don’t you use up the food you have on hand first?” I patiently explained to him that he should be happy (and not snippy) about the amount of food in my freezer and pantry because with what I have on hand I could make a lovely dinner. And, in half an hour. So there! Well, a challenge was thrown down – he would randomly pick some ingredients, I would cook it and if he liked it, I won. Kind of like that show Chopped where the chefs get a basket of random food and have to make a dish in a time limit, except there is no $5,000.00 prize. (What I win is still in question, maybe it is a trip to Paris – Oh! The glorious food markets they have there…) OK, game on! He picked some chicken thighs, a jar of BAKER Naturals Peach Pie Filling , made by SOLO Foods (which I like because of the fact there is no high fructose corn syrup in it, it is gluten-free and because I like to save the jars – but that’s another story) and a green pepper. The green pepper was a bit of a cheat in my opinion because he doesn’t like green peppers, but I was not deterred. I added some onion, a red pepper, some garlic, gluten-free soy sauce, crushed red pepper and fresh lemon juice and made a lovely skillet dish of savory peach chicken. I even tossed in some brown rice and an arugula salad just to show off a bit. It was ready in half an hour and he loved it! (Maybe there was a little stack of green peppers left on his plate at the end of the meal, but still…) So I think I have proved my point – a well stocked pantry is the key to making dinner quickly. And with a little imagination you can change around the use of ingredients (like turning peach pie filling into a chicken dish) and come up with something new and delicious! Maybe next time I make this recipe I will toss in a little piri-piri sauce. Savory Peach Chicken Ingredients 2 tablespoons olive oil 6 boneless, skinless chicken thighs salt and pepper 1 medium onion, diced 1 green pepper, chopped 1 red pepper, chopped 2 cloves garlic, mined 1 – 26 ounce jar BAKER Natural Peach Pie Filling 1 tablespoon gluten-free soy sauce ½ teaspoon crushed red pepper (more or less depending on how spicy you want it) Juice of 1 lemon Directions Heat a large skillet over medium-high heat. Add the olive oil and heat. Season the chicken with some salt and pepper and brown in the hot oil, about 3 or 4 minutes per side. Remove the chicken to a plate, add the onion and peppers and cook until they start to brown and soften, about 5 minutes. Add the garlic and cook for 30 seconds. Add the peach pie filling, soy sauce, crushed red pepper and stir to combine. Add the chicken along with any juices that have accumulated on the plate, cover the skillet, turn heat down to medium and cook until the chicken is cooked through, about 10 minutes. Add the lemon juice, stir and serve. Makes 6 glutenfreeRecipes servings. Article Source : http://simplygluten-free.com/blog/2011/06/gluten-free-savory-peach-chicken-skillet-dinner.html
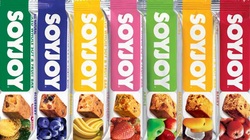 Many soy products contain “soy isolate”. It’s what makes soy unhealthy. Soy Isolate is a product derived from separating or isolating the protein from the soy bean. In theory this sounds good but on the contrary, the method by which soy isolate is processed and manufactured involves acid washing it in aluminum tanks. As a result, it contains large amounts of aluminum. In addition, nitrites and chemical flavorings are often used to add flavor to the finished product. According to the American Dietetic Association, soy isolate contains anti-nutrients that can actually delay your body’s ability to digest food and absorb nutrients, a problem those of us with Celiac Disease or gluten intolerance deal with anyway. Whole Soy contains all the good which soy has to offer (loads of non-animal protein, fiber and omega 3 polyunsaturated fatty acids. It can lower cholesterol and is rich in bone-building calcium, zinc, magnesium and iron) without any of the bad stuff of soy isolate. SOYJOY nutrition bars are made with WHOLE SOY, not soy isolate. SOYJOY nutrition bars contain no trans fats or hydrogenated oils, no artificial colors or flavors and glutenfree. What they do contain is nutritious whole soy, real fruit and a whole lot of yummy flavor!
|
 RSS Feed